Saturday, December 5, 2015

13 Hardcore EJBCA PKI options explained

This blog post is based on my 'Hardcore PKI' presentation at PrimeKey Tech Days 2015. The EJBCA functions described can help you integrate PKI more efficiently for specific use cases.

What is hardcore PKI?

Technologies such as ASN.1 and X.509, RSA and ECC Standards and APIs are extremely complex for most users and developers, and the important process of fitting them all together in standards (to enable interoperable systems) is very hard. However, implementors of PKI systems don't have to care about these hardcore technologies due to a few helpful tools:
  • ASN.1 parsing is done using the library BouncyCastle
  • Digital signatures with RSA and ECC is also done either using BouncyCastle in software, or it is done in Hardware Security Modules.
  • Standardization is done by organizations such as IEFT and Oasis.
When people think about PKI they often think about hardcore technologies, but because of these handy tools, the technologies themselves are not what is hardcore about PKI.

The Devil is in the Detail

Hardcore PKI, in my opinion, is that everybody needs and uses PKI, but always in slightly different ways. This demands from the PKI to have the ability to support a lot of different architectures (which EJBCA does) and from you to be able to configure and fine tune your PKI according to your precise needs. The devil is in the details!
The many possibilities of configuring several details is really the hardcore part in PKI.

Thirteen EJBCA options explained

Here are thirteen examples of hardcore details that can truly make your PKI better integrated. But unless you are looking for one or more of these specific features,  these options may appear somewhat incomprehensible.
One reason for EJBCA to provide all these functions is to support policy enforcement all the way from Complete Enforcement by the CA, to All Enforcement in the RA (where the CA trusts the RA blindly).
On to the details! Most of the options are also described in the EJBCA User Guide.

Permissions
EJBCA Certificate Profile override and certificate storage options
EJBCA Certificate Profile options: override and certificate storage
  • Allow validity override – Normally validity is determined by the certificate profiles, but with this option the validity period can be taken from the request sent by the client/RA.
  • Allow extension override – Normally certificate extensions are determined by the certificate profiles, but with this option the extensions can be taken from the request sent by the client/RA.
  • Allow DN override – Normally the DN is pre-registered and determined by the end entity record, but with this option the DN can be taken from the request sent by the client/RA.
  • Use Certificate storage – An interesting option where you can choose to not store issued certificates in the CA database. This fits specific use cases where revocation never needs to happen and you want to issue large amounts of certificates without the burden of administrating a growing CA database. A kind of fire and forget CA.

Other data
EJBCA Certificate Profile CN postfix and single active certifiate options
EJBCA Certificate Profile options: CN postfix and single active certificate
  • Use CN postfix – tells the CA to add some text after the CN in the issued certificate. Can be used to get user friendly names (like 'Tomas – Encryption' and 'Tomas – Signing') in browser certificate dialogues.
  • Use DN and altName subset – use this if you want to register more information about end entities, than is visible in the issued certificate.
  • Approvals – enforces dual control (or four eyes principle) for certain functions such as revocation and key recovery.
  • Single Active Certificate Constraint – automatically revokes an end entity's old certificate when a new certificate is retrieved. This ensures that a user or device can only use one certificate at a certain point in time.

Directives
EJBCA Certificate Profile enforce public key and DN options
EJBCA Certificate Profile options: enforce public key and DN
  • Enforce unique public keys – makes two end entities unable to use the same public key.
  • Enforce unique DN – makes two end entities unable to share the same subject DN.
  • Enforce unique Subject DN SerialNumber - makes two end entities unable to share the same SerialNumber component in the Subject DN. The SerialNumber in the DN is typically used for device serial numbers, thus ensuring that one device is only registered as a single end entity.
  • Use User Storage – when disabled, end entities are not stored in the database when issuing certificates through an RA capable protocol. Saves space in the database, but removes some functionality.
  • Use Certificate Storage – when disabled, certificates are not stored in the database when issued. This option enables issuing of billions of certificates without using any storage space, but on the other hand disables several of the commonly required PKI functions such as revocation.


The Key Take Aways

All of the obscure functions described above are used in real life, for various use cases. Some very domain specific, some more generic. The key take away, is that these functions provide short-cuts for use cases where you thought you would have to do work-arounds, or be limited by the capabilities of a specific product. With the functions described (and several others) you can integrate PKI in your use case in the most efficient way, only having your imagination setting the boundaries.

EJBCA Enterprise

In EJBCA Enterprise we strive for maximum flexibility, only having a single platform to manage all needs of PKI. This means EJBCA has to be available for all platforms, and be ready to implement many protocols and multiple APIs, while enabling you to use your PKI from many locations. In order to do this we need to support many different PKI architectures (as was explained here).

More information

Basic information on EJBCA Enterprise PKI and PKI Appliance developed by PrimeKey.
EJBCA is a registered trademark of PrimeKey Solutions AB in the EU, the United States, Japan and certain other countries.

Sunday, July 5, 2015

Authenticode Code Signing with SignServer Enterprise

In this blog post we will focus on the support for signing Windows executables with SignServer Enterprise using Authenticode, one of the most popular formats.

Digital Signatures and Central Code Signing

Whenever software is being distributed over the Internet (or other insecure network), or it is stored on untrusted media, it is crucial to use a reliable signing tool to digitally sign all executable files such as applications, libraries and drivers.
Harmful code is today a real threat to users and organizations alike, as criminal groups and even governments use malicious software to steal and monitor data, extort money or empty your bank account.
Digitally signed code ensures that the transferred software is trusted and unmodified. That is, as long as one picks a secure signing tool. Simply setting up any code signing tool you are able to find, may result in an insecure solution that makes you vulnerable to all sorts of attacks. PrimeKey's signing solution SignServer Enterprise, is proven and allows you to keep your code signing keys and certificates secure and audit ready.
Code signing is crucial for distributing code in many systems:
  • Windows executable files, libraries, drivers and updates.
  • Firmware for hardware devices.
  • Mobile apps (Android, iOS)
  • OS X apps, XCode.
  • Java applications (Applets, WebStart, Oracle Java).
  • Plugins and addons in man applications (Mozilla, Firefox, Thunderbird XPI, NetBeans modules etc).
  • Software from repositories for Linux and Apple OS X.

Three good reasons to use Central Signing

Protection of Signing Keys

The primary reason to use a secure, centralized code signing solution, is to keep code signing keys protected. For this purpose, keys are kept securely in a Hardware Security Module (HSM), mitigating the risk of any key being stolen or used illegitimately.

Centralized control

Many organizations have code signing keys and certificates spread out in different departments and with different developers across the organization. Keeping track of where the signature capabilities reside, and who is allowed to sign code on the organization's behalf, quickly becomes difficult or even unmanageable.
With the centralized signing solution the code signing capabilities are easily controlled from a single location, and the risk of code signing keys being lost or stolen is significantly decreased. The more efficient handling lowers the costs and you may even escape from buying code signing certificates for different people.

Policy and Audit compliance

An organization needs to be able to see exactly when, and for what, a particular code signing key (and its certificate) has been used, and there are usually strict policies surrounding how code signing should be done.
Using a central code signing solution makes it easy to achieve and enforce a strict audit record of who signed what. Some organizations demand this because of external audit requirements. While others need it to maintain trust in their brand, where maintaining good policy and audit records assure that the users of their products are not exposed to unnecessary risks of malicious software.

Using SignServer for code signing

SignServer is PrimeKey's code signing solution that helps you to keep secure control of your code signing keys, and also provides a centrally managed and audited single service for all your code signing needs.
SignServer lets different project members or systems authenticate and share the same well protected code signing key and certificate when signing, and at the same time provides audit records of who signed what. For that matter, SignServer can also control individual code signing keys where only one person is granted authorization.
SignServer Enterprise serves most code signing needs using different signers and custom plug-ins, and support for Authenticode was added from SignServer Enterprise 3.6.3. All you need to start signing code is a signature key pair, generated by SignServer, and a code signing certificate, issued by a private CA such as EJBCA or a public CA.

Windows' Authenticode for executable files

Microsoft has specified a format for digital signatures in software binaries called Authenticode. Using Authenticode, the signature is embedded within some type of portable executable (PE) file, typically with file endings like .exe, .dll, .sys and .ocx.
In Windows, after an executable file has been downloaded and is about to be run, a security warning dialog box will appear (see picture below). At this moment the embedded signature has been verified, the code signing certificate has been verified that it was issued by a trusted CA, and the name of the publisher is displayed to the user. The dialog box asks the user to confirm if it is ok to start the application created by that publisher:
Security Warning when running a windows executable that was properly signed.
Do you want to run this file? Publisher: Mozilla Corporation

If the file had not been signed, a different warning would be displayed, asking the user to confirm that the software should be run, even if the publisher is not known:
Security Warning when running a windows executable that was not properly signed.
The publisher could not be verified. Are you sure you want to run this software?
More technical details are available in an Authenticode whitepaper published by Microsoft.

Authenticode in SignServer

Since SignServer Enterprise 3.6.3, there is an Authenticode signer for PE files.
The signer is configured just like any other signer in SignServer. The only special requirement for this signer is to use a code signing certificate.
If your organization already has a CA (for example EJBCA) configured to be trusted by your users, you can use that CA to issue the certificate. Otherwise you could buy a certificate from one of the CAs already trusted by default in Windows.
For testing purposes, and also for test environments in general, you could issue the certificate yourself. Just remember to have the extended key usage “Code Signing” set and that you have to install the CA certificate in your test environment.
You need to install the CA certificate in your test environment and remember to have the extended key usage set to “Code Signing”.
In addition there are a few configuration options that can be applied to specify additional attributes, such as: the name of the application, if time stamping should be used, which service to use etc. Details of configuration options are documented in the SignServer Manual.
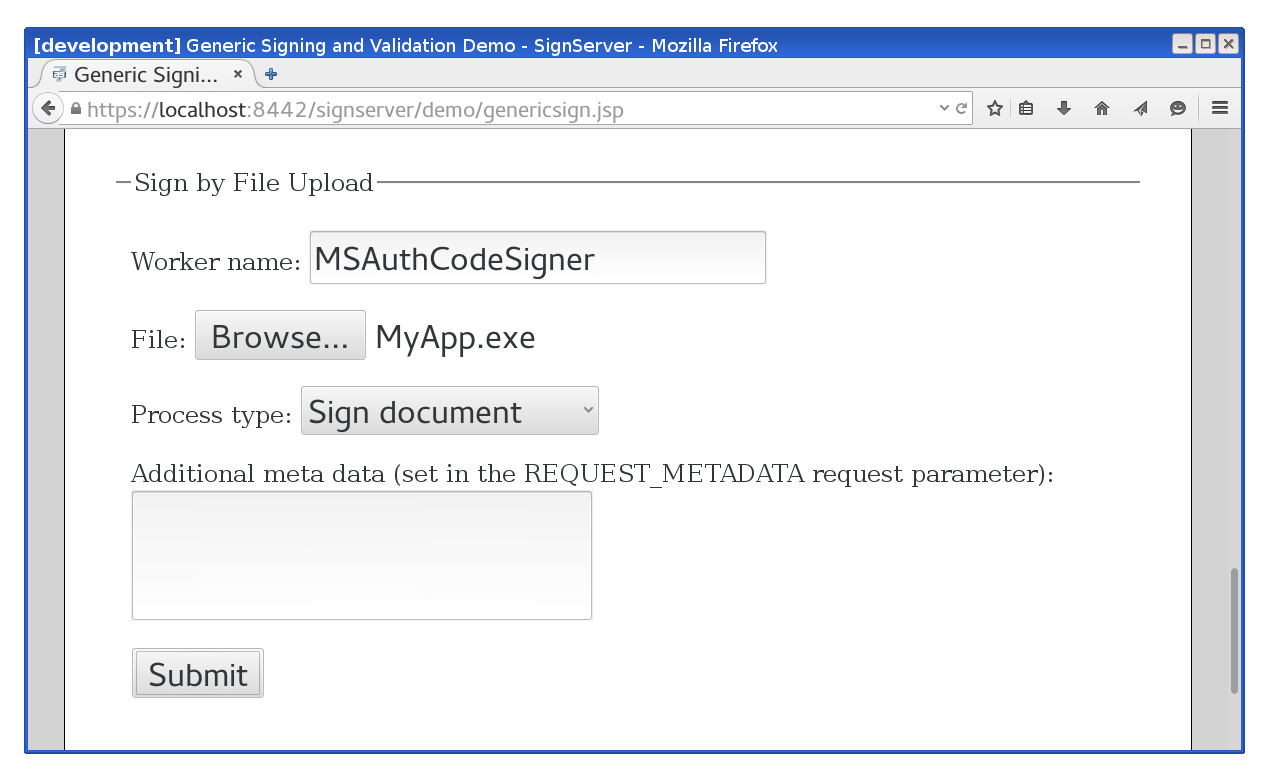
After configuring and activating the signer, a user can sign code, for example by using the Generic Signing page, specifying the name of the signer and providing the binary to upload:
SignServer uploadform for files to be signed.
Signer upload form

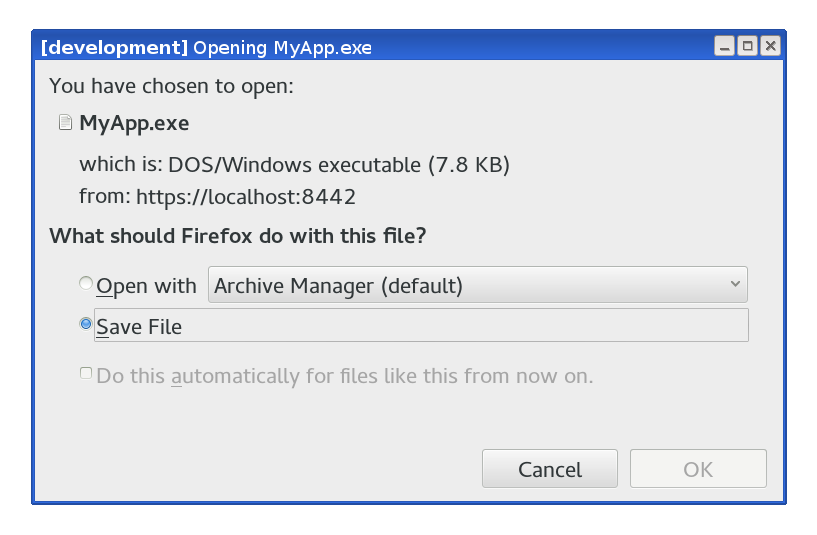
After submitting the file, the signed version (with the embedded signature) is returned:
Download dialog for download of signed file.
Save signed file

In Windows, the signature attached to a specific file can be manually inspected:
  1. Right click on the file and choose Properties.
  2. Click on the Digital Signatures tab.
  3. Select the signature in the Signatures list and click Details.
Signature details of a signed executable file.
Displaying the signature details on an executable file

Integration

You can use other interfaces of SignServer (such as the web service interface) to integrate code signing with other systems and applications in a completely transparent way.

More information

Basic information on SignServer Enterprise and PrimeKey Code Signing Appliance is available at PrimeKey.

Sunday, April 5, 2015

High Availability for PKI in 8 Simple Steps

PKI Appliance takes HA Clustering to the next level

Historically, setting up and maintaining High Availability (HA) setups for PKI, required a lot of knowledge about the database in use and how it would interact with HA.
Lately, the packaged PKI product PrimeKey PKI Appliance (running EJBCA and/or SignServer), manages to hide the HA complexity and makes HA easy to setup, robust during operation and simple to handle during recovery. Clustering a PKI has never been easier!
On the PKI Appliance we define the meaning of High Availability as being able to keep services running non-stop, with full data integrity for all included applications.

High Availability Fail Scenarios

Real High Availability requires a cluster setup of three nodes. The reasoning here is that in the case of a node failure, the system should continue to operate on its own, without any administrator measures needed.
Hot standby with manual fail-over is a two nodes cluster setup, which to a lesser extent reduces administration efforts for running systems. Here, the assumption is that depending on which node eventually fails, the system either continues to operate or needs to have a button clicked.
A main site hosting two PKI Appliances and a DR site hosting one PKI Appliance.
With its handy instructions and simple web GUI configuration, PrimeKey PKI Appliance makes it possible to quickly set up a cluster for Disaster Recovery (includes a main site and a remote site).

Technical details

High Availability with the PKI Appliance is implemented using database replication between cluster nodes connected within a network. Using active-active cluster technology means that all the nodes can be fully utilized in the cluster setup. The implementation uses regular network connectivity over the application interface for all cluster communication, which means that cluster nodes don’t have to be placed physically close, as long as they have good network connectivity.
The drawback of most cluster technologies, is that a node cannot distinguish between a failure of another node (such as a broken power supply) and disrupted network connectivity (such as a broken network switch). So in order to avoid a situation where cluster nodes start to operate independently and get diverging data sets, a so called split brain, the cluster nodes take a vote and cease to operate unless they are part of the majority of connected nodes. This way there is only a single data set that can be updated at a specific time.
In case of a temporary network failure, disconnected nodes automatically synchronize their data as soon as the network is back, then start to operate again as if nothing had happened.

Howto: Setting up a 2 node cluster (Hot standby with fail-over)

Using the Appliance Web Configurator it's easy to set up a two node cluster in a few easy steps. Setting up a three node PKI cluster (real High Availability) works the same way, and clustering a PKI has never been easier!
  1. Make an installation according to the standard installation procedure on the initial Appliance node.
  2. On the initial node, go to the cluster tab in the Appliance Web Configurator. To start with it shows the Appliance running as a single instance.
    The PrimeKey PKI Appliance Web Configurator showing cluster configuration of a single instance.

  3. Still on the initial node, add a connection (IP address) to where the second node’s application interface will be. The Appliance will now configure the cluster settings and produce a setup bundle for the second node.
  4. Adding a second cluster node IP in the PKI Appliance.
    PKI Appliance cluster configuration going on.
    PKI Appliance cluster configuration completed.

  5. Download the setup bundle for the second node by clicking Create and Download.
    From the first node, downloading the configuration package for the second cluster node.

  6. Factory reset the second node and connect to the Web Configurator.
    PrimeKey PKI Appliance initial screen after Factory Reset.

  7. On the second node, select the Connect to cluster option and upload the setup bundle.
  8. Uploading cluster setup bundle on the PKI Appliance.
    When processing an uploaded cluster setup bundle, a domain master secret must be specified.
    Date and time settings when connecting PKI Appliance cluster node.
    PrimeKey PKI Appliance Cluster configuration preview on second node.
    Ready to begin installation of second Appliance cluster node.

  9. After the installation has been completed, you should be able to manage the new node using the same login credentials as with the first one.
  10. The two nodes are now installed and can be used. Status of the second cluster node shows up as Connected.
  11. PrimeKey PKI Appliance Web Configuration cluster status with two nodes.

More information

Basic information on EJBCA Enterprise PKI and PKI Appliance is available here.
EJBCA is a registered trademark of PrimeKey Solutions AB in the EU, the United States, Japan and certain other countries.

Monday, February 9, 2015

Peer Systems in EJBCA Enterprise 6.3.0 - introduction and tutorial

We hope that you'll get as excited as we are about our latest new EJBCA feature: Peer Systems. We'd like to take this blog post to tell you all a little about what this means and how EJBCA Peer Systems will improve your PKI, as well as give a simple tutorial on how it works.
Peer Systems is a protocol for communicating between EJBCA nodes securely. Its purpose is to allow propagation of data and information in a synchronous fashion, without requiring a safe connection or an isolated network. In previous iterations of EJBCA the only means of communication were either the WebService API or direct database publishing. Web services is on one hand too slow to use for data heavy applications like very high speed certificate publishing, while database publishing needs database specific security measures or a closed network, seldom an option for OCSP.
Two requirements have prompted Primekey to move towards developing a brand new feature set:
  1. The need from the PKI Appliance platform to be able to set up OCSP responders without redeploying the application, requiring steps to be performed via the CLI or set up special database rules.
  2. The value of enabling our users to spend less time digging into the server configuration, setting up database connections. VA machines can often be physically or geographically inaccessible from their respective CAs, and Peer Systems is a step in the right direction making things easier to set up using only the GUI.
Note that this feature is for EJBCA Enterprise customers only. If you'd like to find out how to enroll, please contact us.

Initial Concepts

This tutorial will cover an installation involving two machines in a PKI setup, a Certificate Authority (CA) and a Validation Authority (VA) serving as an OCSP responder for the CA. We will be building on concepts introduced in earlier versions of EJBCA 6, so if you're not familiar with the creation of End Entities or OCSP Key Bindings, feel free to check our User Guide.

Establishing Trust

For this tutorial, all communication will be initiated on the CA, so our connection will be one way. The first thing we need to do is to establish trust between the two machines (CA and VA), and we will do so by creating an Authentication Keybinding on the CA.
  1. Click on the Internal Key Bindings item in the menu and choose the AuthenticationKeyBinding tab.
  2. Create an authentication keybinding using the crypto token of your choice. The crypto token chosen will be the one providing keys for the TLS connection.
  3. Return to the AuthenticationKeyBinding overview page. Notice that your newly created keybinding isn't enabled, and doesn't have a certificate. Let's fix that.
  4. Click on the CSR button in the Action column.
  5. On the CA machine create an End Entity and issue the keybinding certificate. Make sure that Key Usage: Digital Signature and Key Encipherment and Extended Key Usage: Client Authentication are set in the Certificate Profile.
  6. Return to the AuthenticationKeyBinding overview page on the CA machine. Import the certificate you got in the previous step to your authentication keybinding by clicking the Update button.
  7. Enable your keybinding.
A properly set up Authentication Keybinding

Setting up the Outgoing Peer on the CA

Now we'll talk about how to set up our CA and VA as Peers.
  1. Incoming connections are disabled by default, so first of all on the VA, click on Peer Systems in the admin menu and then click on the Allow incoming connections checkbox.
  2. Now go to the CA, and enter the Peer Systems page here as well.
  3. Click on the Add button under Outgoing Peer Connectors.
  4. Create new Peer, making sure to enter the VA's address (matching the VA's server side TLS certificate) and the selected authentication keybinding.
A newly created Outgoing Peer on the CA

Setting up the Incoming Peer on the VA

  1. Click the Ping button for the Outgoing Peer (on the CA) and you'll get the reply "Unable to connect to peer. Unauthorized." Not to worry, you simply have to add rights on the VA.
  2. Import the CA certificate of the CA (used to issue the certificate for the End Entity on the CA in the steps above) as an External CA.
  3. Go to the VA, and under the Incoming Connections section you should see the incoming connection from the CA. To the right you'll see the button Create Authorization (see screen shot for required options).
  4. Either add the incoming peer to an existing role or go right ahead and create a new one.
  5. In the next screen, choose the required rights for the incoming connection and click on Create Authorization.
  6. Returning to the Peer Systems screen, there should be a newly created role under the First matching role column of your created peer.
  7. Returning to the CA, you should be able to ping the VA as before, now receiving a response.
  8. Congratulations, you've established trust.
Authorizing an Incoming Peer

Setting up a Validation Authority Peer Publisher

The last step is to set up a Validation Authority Peer Publisher, which happily works just like the old VA Publisher.
  1. On the CA, go to Publishers and create a new publisher.
  2. Choose Validation Authority Peer Publisher as a type and choose the newly created peer as a Peer System.
  3. Click Save and Test Connection and you're done!
You've now set up VA Publishing between CA and VA, without having to grant any database rights or allowing direct database access over network to your VA. Cheers!

More information
Basic information on EJBCA Enterprise PKI is available here.
EJBCA is a registered trademark of PrimeKey Solutions AB in the EU, the United States, Japan and certain other countries.